torstai 4. helmikuuta 2021

Electro Gates - An Upcoming Puzzle Game For The C64!

Hi, readers!

As I proved with my latest C64 game, The Great Washing Machine King, I haven't stopped making new C64 games.

Now that I've finished that game, I'm already in the process of creating a new one.

Electro Gates is a puzzle game that I started developing some years earlier, but I had to put the project on hold for an indeterminate period of time. This was because back when I was making the game, I had a somewhat stressful time at the uni where I was studying to get an IT degree.

But now I've graduated and right now, there are no other time consuming commitments either. So, now I can work on C64 projects again. :)

The goal in Electro Gates is to get to the exit. But this is not an easy task. Or, well, that actually depends on how tough a level the user has created. ;) Anyway, there are some electric gates at the maze that the protagonist has been put into. Hence the name of the game. The gates can be toggled on or off, though, by pushing buttons that toggle certain gates.

By pushing the buttons in the correct order, our protagonist can turn off enough gates to be able to proceed further in the maze. If all the gate(s) leading to the exit have been turned off, then nothing is stopping him from advancing to the next level of the game.

Electro Gates will have a level editor. My goal is to make it as easy to use as possible. The editor will also have instructions which will hopefully make it even more user friendly.

Here are some screenshots of what I've done so far.

Placing some tiles in the level editor


Use the tile selector to select the tile to draw

I might post more progress updates now and then. In any case, I will, of course, let you know when I've finished the game and uploaded it to CSDb.

Be seeing you!

- The Mad Scientist

sunnuntai 10. helmikuuta 2019

A New MS-DOS Game Is Coming Out... Maybe

Hi, readers!

Now that I know 6502 Assembly, Z80 Assembly and even x86 Assembly, I thought it would be quite fun to make use of my x86 knowledge by making some silly MS-DOS games! :)

One such game could be this silly game that I've planned which uses ASCII text mode characters for graphics and beeper sounds.

The working title for this game is Joonas's Mega Crazy Adventure! :D

The game would use my own adventure game interpreter which I call JAAGI. It stands for: Joonas's ASCII Adventure Game Interpreter.

There was this silly game in 1991 called ZZT which also used ASCII characters for graphics and PC Speaker sounds. The good thing with the default text mode is that it is pretty easy to program in Assembly, or C, or C++, or whatever.

The inspiration for JAAGI is, of course, Sierra's classic AGI (Adventure Game Interpreter), which Sierra used for their 16-colour adventure games. In those games, you progressed by telling the main character what to do by typing a command with the game's parser interface. For example, if you wished to pick up a rock, you would type "GET ROCK". The protagonist would then pick up the rock if it was allowed. If it wasn't, the game would show you some kind of an error message.

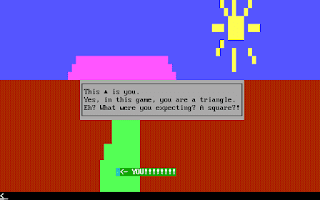
Below are some screenshots which show what the final game might look like. I'm not sure if I'll actually have time to finish even a simple DOS game, but if I do, this game will be first on my list. Be sure to download it from my website www.joonaslindberg.fi if it comes out.

Be seeing ya!


tiistai 4. huhtikuuta 2017

The Creation of a New Tape Loader Game

Greetings, everyone!

I recently got a pretty strange idea. I decided to reverse engineer the C64 tape loader, Invade-a-Load.

Invade-a-Load is a Space Invaders clone written in 1987 by Richard Aplin, who also wrote the Load 'n' Play tape loader game. These tape loader games were pretty cool. It was really neat that you could play a game while the actual game was loading from tape. Tape loader games made the loading time on tape seem much shorter because you already got to play a game while waiting for the main game to finish loading.

When I found out how exactly the loader works, I replaced the original tape loader game with my own game, Break Free!, which is a simple-ish Break Out clone.

Changing the loader game wasn't too complicated. The only thing I had to do was to remove the old program at $F87B-$FF8F and put my own code there instead. My game begins at a slightly different address, so I also re-directed the JMP at address $F803 to JMP at my own game code.

I also changed a tiny little thing in the loader. Invade-a-Load loads 3 files for the loader game. One of those files is the Rob Hubbard music. However, since my game has only sound effects and no music, it only loads two files: the character set at $F000-$F1FF and the actual game at $F800-$FFF8. So, I changed the value at address $0349 (ROM Loader file) from 3 to 2.

Before I started creating Break Free!, I experimented with SID sound effects. I was actually going to make a soundless tape loader game at first, but after having fun with sound FX experiments and coming up with sounds that sounded pretty neat to me, I quickly changed my mind. In fact, for some reason it was the sounds that made me want to build a game around them. :)

Creating the new tape loader game was great fun. Stay tuned for future releases from me. I have several upcoming C64 games in the pipeline after all, one of them being Electro Gates. I might write something about that game in my blog one day.

See you in my next blog entry!

tiistai 28. huhtikuuta 2015

Secrets of Turrican II Revealed

Greetings, readers!

Long time no blog, due to lack of time. But I do occasionally have short periods of spare time, which I usually dedicate for coding. This time I decided to hack one of my favourite games and write about it in my blog.

So far I have played around with 8-bit games to get maps from them or to see if they contain some kewl hidden stuff in the code. It was about time to try that stuff with the 16-bits. Yep, it was time to rip apart an Amiga game! ;) Perhaps in the future I will try to reverse engineer games from other 16-bits as well, provided that I can find the time for that. The SNES, for example, certainly has some interesting games to play around with.


Now I have dipped my toe into the 16-bit water. The game with which I began is a huge classic among Amigans. A real legend, a stunning masterpiece, a fantastic demonstration of what the Amiga can do when given to the right hands. Total design and gameplay perfection on the Amiga.

Yep, the game in question is Turrican II - The Final Fight!

Turrican needs no introduction. When Rainbow Arts created this game in 1991, many jaws dropped. A colourful, fast paced, intense platformer shmup with constant 50 fps performance, great level design and a mind-blowingly fantastic soundtrack. It was extremely well received by both magazines and gamers. What would be a better game to start with than Turrican II? Not only is it one of my favourite games for the Amiga but it's also a fairly simple game, and therefore very ideal to play around with.

In order to find what I was looking for - the level data -  as quickly as possible, I used the best Amiga emulator in the world, UAE, and a saved snapshot image. By default, UAE saves compressed snapshot images, so the uncompressed option must be selected from the dropdown menu. Turrican requires no more than 512 k of RAM, which made modifying the game even easier.

I had a really great time editing this game! Then again, when was the last time that I didn't have fun exploring the code of a game? :) In a fairly short time, I found the level data from the .USS (UAE snapshot) file. The way the tiles are put onto the screen is pretty interesting. Tiles in level data are usually placed from left to right, from top-left to bottom-right. But in Turrican 2, the tiles are placed from top to bottom and once the bottom has been reached, the tile X position increases by one. The image below shows 6 tiles and their hex values.

In the level data, the bytes for those tiles are in this very sequence: 2C 01 02 03 04 05

In the snapshot file, the level data begins at offset 0x44200 and ends at offset 0x46279. The size of level 1 is 163 * 51 tiles. Each Turrican tile is 32 * 32 pixels.

For a perfect editor, I would still have to find out where the enemy data, bonus block locations and data for the mid-bosses is, but for now, this will do. I hope this info was helpful as well if you're going to make an editor yourself.

Stay tuned for new blog entries or possible updates. Bye for now! ;)

perjantai 21. maaliskuuta 2014

Assembly on Intel CPUs!

Greetings, dear readers!

A few days ago, I got an idea. I have learned the ASM of some 8-bit CPUs, namely the 6502 and Z80. What about learning a new Assembly language? Such as the Motorola 68000, or the Intel x86?

Of those two, I chose the latter. I have heard from various sources that knowledge of x86 ASM is pretty much a must for any professional programmer. Although you don't usually create large programs in Assembly on the PC, it is a good idea to have at least a basic understanding of x86 ASM because it can help you in debugging your programs, which you would typically create using C++.

x86 Assembly

I must say that machine language on Intel's CPUs looks very pleasant to my eyes. It reminds me of Z80 Assembly quite a bit, which is certainly a plus. Take the in (Input from port) and out (Output to port) opcodes for example. Sound familiar? Yep, you had such instructions on the Z80 too. You also have nop in x86 ASM. This No OPeration opcode seems to be in every single microprocessor. It can be found in the 6502, Z80, M68k and x86.

The x86 also has call and ret opcodes. If you know what these opcodes do on the Z80, you also know what they do on the x86.

All in all, Assembly on the x86 CPU is very pleasant as I mentioned earlier, and it might become my new favourite at some point. I won't make a long blog entry this time, but I will probably write more about the x86 another day. I wrote this entry quite late at night after a long day of university and after quite a bit of experimenting with x86 ASM, needless to say! :) I want to get back to x86 coding as soon as possible.

Keep an eye out for updates on my blog. Thanks for reading, and keep coding in Assembly, it is super kewl!

Bye for now!

sunnuntai 7. heinäkuuta 2013

MORPH Gets Ported Over to an Another 8-Bit!

Greetings, dear readers!

It has been some time since I last posted here in my blog of mostly techy stuff. Some weeks ago, I got the strange idea to teach myself Z80 coding. Having played some games on the legendary ZX Spectrum, I thought it would be cool to create my own games for that platform. Although I didn't own a Speccy as a kid, there's something oddly cool about that 8-bit.

Like the 6502, the Z80 is an 8-bit CPU, just a bit more powerful in some ways. With this in mind, I assumed that the Z80 instruction set would be as easy to learn as the 6502 instruction set. And how right I was! After just a few days of practising, I was already coding something for the Speccy. That something would eventually evolve into a complete game:

MORPH.

But before talking about MORPH ZX, I'd like to say a few words about the Z80 CPU which the Speccy uses.

Z80

The Z80 is actually a very fun CPU to code for, despite what some people might tell you. Although the Z80 doesn't quite have an equivalent of the following opcodes,

LDA $01
LDA $01,X
LDA (ADDRESS,X)
STA (ADDRESS),Y
INC MEMORY_DIRECTLY
ASL MEMORY_DIRECTLY

there are some other powerful opcodes in the instructions set that make up for it. Such as:

LDIR

This two byte instruction would copy a block of memory from one location to another, in just 21 CPU cycles!

With the Z80 CPU, you can load 16-bit values easily with just one opcode, instead of two opcodes as it is on the 6502.

The Z80 has conditional jumps, conditional relative jumps, conditional jumps to subroutines and conditional returns, something I would love to have on the 6502.

The Z80 has 6 registers: AF, BC, DE, HL, IX, IY. The 6502 has only 3 of them: A, X and Y! The IX and IY registers of the Z80 are always 16-bit registers.

What's more, there's a copy of the AF, BC, DE and HL registers. You can easily exchange the two copies of the registers with the EXX opcode. To be exact, you have to use EXX and EX AF,AF' in order to swap all of the registers, including AF which is left intact by the EXX opcode.

When you have done 6502 coding previously, it is quite likely that you'll make some mistakes with the Z80 syntax now and then. I've lost count of how many times I've been about to type:

LDA #$05

when typing Z80 code, even though the Z80 equivalent of that opcode is:

LD A, $05

Another thing that might confuse 6502 coders is that there doesn't seem to be a "store" instruction on the Z80. For example, you would use the following instruction on the 6502 to store the A register to memory:

STA $8000

But on the Z80, we don't "store" values into memory... we "load" them into memory. So, the opcode for storing A into memory looks similar to the opcode for loading a value into A but it is subtly different. The Z80 equivalent of storing A to memory is:

LD ($8000),A

I also like the fact that you can add to the A register without carry if you want to, by using the ADD opcode. The Carry flag does not affect this opcode in any way. However, the good old ADC (Add with Carry) from the 6502 does also exist when needed, so you have them both at your disposal.

The Speccy

The Speccy was fairly easy in general to code for. The only thing that seemed initially quite difficult to handle was the bitmap of the Speccy.

The resolution of the Speccy is 256 x 192. This means that there are 32 x 24 = 768 colour cells on the bitmap.

Each 8x8 cell can have only 2 colours. If you ever wondered why Speccy games look the way they do, this is the explanation for that. That, and the fact that the Speccy has no hardware sprites.

Anyway, the bitmap memory of the Speccy is located at $4000 - 57FF.
The "colour RAM" of the Speccy is located at $5800 - 5AFF. I put "colour RAM" in quotes because it's called something else in the Speccy world. Namely, "attributes".

The way the Speccy bitmap works seems highly confusing at first. On the C64, the bitmap is pretty straight forward. For example, if our VIC2 bitmap is located at $4000 then the appearance of the top left 8x8 bitmap cell would be defined at $4000 - 4007. The next 8x8 cell would be defined at $4008 - 400F. And so on.

On the Speccy, however, the bitmap cells are defined in a different way. To give a shape to the top left 8x8 bitmap cell of the Speccy, you should load values into the following addresses:

$4000, $4100, $4200, $4300, $4400, $4500, $4600, $4700

Because, you know,

$
4000 - LINE 1
4100 - LINE 2
4200 - LINE 3
4300 - LINE 4
4400 - LINE 5
4500 - LINE 6
4600 - LINE 7
4700 - LINE 8

As you would discover from experimenting, the Speccy bitmap is kind of "divided in three":
The first third of the bitmap is at $4000 - 47FF.
The second third of the bitmap is at $4800 - 4FFF.
The third third of the bitmap is at $5000 - 57FF.

And there actually is a pretty good reason for this. Let's suppose that you have a bitmap address, such as $43EA. You would like to colour this area of the bitmap 07 (grey) for instance. How can you find where in the attribute memory the colour cell for this area of the bitmap is located?
Quite easily: you take the low byte of the known bitmap address, $EA. Then you inspect the high byte: The high byte is within $40 - 47, so we are on the first third of the Speccy bitmap, therefore the high byte of the attribute location is $58. So, the location of the colour cell is $58EA! Woohoo! :)

Porting the game

Now that I had learned all I needed, it was time to start actually porting MORPH into the Speccy.

I started out by taking the graphics from the C64 version and modifying them to suit the Speccy port.

First I would take the guy:

Then I would take the Morph ball:
And finally I would take the wall:

There! Now I would have all the needed gfx objects for the game. Well, nearly all of them. The next thing that I decided to do was create a 16 x 8 font for the game. It would be used in the scroll text on the title screen and in the text windows that appear between levels.


Creating the code for the game didn't take too long, something like a week or so. It was pretty easy to port something for which I already had the level data and graphics.

I made some slight changes to the gameplay on the Speccy version of the game. In the Speccy version, all of the 30 puzzles have a password so you can load whichever puzzle you want by pressing Enter on the title screen and giving the password of the puzzle.

Also, I removed the time limit from the Speccy version. I thought that it would be more enjoyable for the players to spend as much time as they want with the puzzles and take their time with solving them. Judging from the feedback that I got on the WOS forum, it was a good move. :)

Very shortly after registering onto the WOS forum and announcing my first Speccy game I already started receiving lots and lots of positive feedback. The people over there greatly liked my game, and they also asked me when my next Speccy game will be coming out. It's difficult to say at this point, but my answer is: Hopefully soon! :) MORPH was such a fun game to port and the Speccy was so fun to code for that I look forward to creating more games for it.

Some guys at WOS thought that I have shifted allegiance from the C64 to the Speccy. But unfortunately for them, I haven't changed sides at all. ;) Instead, from now on I will focus on the Speccy as well as the C64. However, I'd like to finish my upcoming Shiver Me Timbers game before returning to the world of Speccy coding.

All right. I'll now end my blog with screenshots of the game. If you'd like to actually try out the game on a Speccy emulator, you can download it from here: rapidshare.com/files/803069018/MORPH.SNA

See you later! TMS signing out!


The title screen
The info window which shows the level number and the number of lives

The second puzzle of MORPH

torstai 9. toukokuuta 2013

Adventure games and the design bit

Good evening, readers! I was asked to write more about my game in the Shiver Me Timbers dev blog, so here is an update for you.

Shiver Me Timbers has been in something of a stand still lately. Even though all the important code for the game is in place, it will still take a lot of time and effort to create all the rooms for the game. The room editor makes this slightly easier, but only slightly. I still have to go through many steps to create each room and make sure that they take up as little memory as possible. There are also some other things that must be manually tweaked for each room.

Also, Shiver Me Timbers is not the only project to which I've devoted my time. I've been coding some other things as well. One of them is a PC program which will take many months to complete, due to the number of features that it will have.
But that's another story. I might write more about it in an another blog. Today's subject is the room loader of my game.


Room data in adventure games

For Shiver Me Timbers, I was initially going to use 4 x 4 tiles. The nice thing with tiles is that each room has a fixed filesize, and a tile room takes up fairly little memory. Tiles themselves contain so many characters that only a few tiles (And therefore, only a few bytes) are needed to build a room.

However, I quite quickly realised that the tile system probably wouldn't be very useful for SMT. The graphics will have so much variety that with the tile method, I would surely need easily more than 256 tiles.

The next option that popped up to my mind, is compression. And that is exactly what I'm currently using in SMT. So, with this method the room is built onto the screen with groups of 3 bytes. The bytes mean the following:

1st: How many
2nd: Colour
3rd: Char

This means that every room has a different filesize. A really simple room with lots of repeating characters with one colour would take up very little space, while a more detailed room would naturally take up more space.

For example, if we had a room which consists of nothing but white char 1's, it would look like this in memory:

FF 01 01 FF 01 01 62 01 01

Each room is 32 x 19 chars =  608 chars. Or 0x260 chars... I always prefer hex! ;)

0xFF + 0xFF + 0x62 =  0x260


All right, I can't think of anything more to say, so I'll end today's blog here. Thanks for reading, and stay tuned for possible updates! Ciao!